Wednesday, 5 August 2015

Composting - when things go wrong

However experienced you are at composting you will sometimes have problems. Smelly compost is usually a symptom of an anaerobic mix, probable caused by not enough air getting inside the pile. This often happens when you have too much of one kind of ingredient - such as leaves or cut grass - or may indicate lack of turning of the heap.  To solve the problem you need to demolish your smelly heap. Before you rebuild the pile, it’s best to improve access of air and water to the heap.


An unwanted visitor
One excellent way of doing this is by making a compost chimney. To make this you buy – or recycle - a plastic down-pipe which you cut to a little larger than the height of your heap. Score large holes with an electric drill at regular distance along the pipe – every 10cm is ideal – and place at the centre of the new heap. Holding the pipe upright with one hand, slowly rebuild the heap making sure that the green material is well mixed. If the old pile was too wet add some dry materials such as Lucerne hay or shredded paper. When the heap is rebuilt continue as you would for a new compost pile. The compost chimney should stand proud of the pile and will allow air and water to get to the centre of the heap. By sticking the hose into the top of the chimney will allow water to get to the core of the pile. This idea has become very popular with home gardeners in recent years and makes better and faster compost with little expense. While one compost chimney is sufficient for a small moulded compost bin, two or three will be more efficient in larger heaps.

While it’s hard to deter foraging rats and mice, it can become a real problem when they decide to nest in your heap. Rodents living in the bin indicate that you have provided not only a reliable food source but a well drained warm home. The best way of getting rid of these creatures is by regularly working the heap with a garden fork and applying human urine to deter them. Rodents love cereals, so their presence can indicate that you – or someone else in your home – are putting bread and other cereals in the compost bin.

The most common pests associated with compost heaps are flies. You have to put up with some flying insects being near your heap as they are attracted to this nutrient rich environment. One way to reduce the problem is to keep your pile covered. For the smaller bins use an old hessian or plastic sack over the heap and close the plastic lid. For larger heaps it’s best to cover the heap with a piece of large weighted down plastic. This will deter flies, warm the heap and protect the pile from excess rain.

Monday, 3 August 2015

Making compost - it's a piece of cake

Composting is a natural process, where organic matter breaks down to create humus. In nature this happens all the time when green plant matter dies or falls from trees or shrubs, but since the middle of the last century we humans have began to understand the process of decomposition and the importance of organic matter in the soil. With rapidly reducing rainfalls, caused by climate change, compost has been found to be invaluable as it retains moisture in the soil and acts as a buffer against extreme environmental conditions.


Household waste ready to be composted


While you can be extremely technical about making compost, the non-scientist should approach the process as if they were a cook trying to make a cake. For a successful end result – be it a cake or garden compost - you need the right ingredients in the appropriate quantities as well as sufficient water, adequate air and the appropriate length of ‘cooking’. While anything that once lived can be composted its best to stick with reliable ingredients such as grass clippings, kitchen scraps, leafy garden pruning’s, shredded paper, fallen leaves and even old potting soil. The value of your compost relates to the quality of the ingredients, the position and size of the compost heap, the ambient temperature and the amount of time you spend turning the pile.

Large Gardens
For those with large gardens composting can be done on a big scale. The popular choice is to have three compost bays – or bins -placed next to each other. The bins are usually made of hard wood (ideally non-cyanide treated) and are exposed to the earth at the base below. In the first bay you place all your fresh green matter – grass clippings, garden pruning’s, fallen leaves, kitchen scraps, shredded paper and added water. After this has been in the heap for a couple of weeks it can be turned into the next bin.
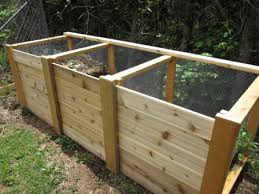

The three bin system is ideal for larger gardens


The process of turning the pile mixes the ingredients and introduces air to the centre of the heap. At this stage, check to see if the mix has sufficient moisture, too dry and the compost will take ages to break down, too wet and it will become smelly. With the right mix of ingredients, as well as air and water, the heap should become hot and ‘steamy’. If this is not happening the mix requires more air and more, or less, water and perhaps some poultry droppings or manure to give it a kick-start. After a couple more weeks ‘cooking’ the second bin can be turned into the third bay. Again check moisture levels at time of turning and make sure all the heap has turned to a brown colour. Depending on how warm or cold the weather is, the compost should be ready to use in a couple of weeks. 

Small gardens
The principals of composting are roughly the same for small gardens as they are for large ones. The main difference is that you are unlikely to create enough green waste to fill three bins and even if you did you wouldn’t have the room to place them in the garden. However much you like composting, these bins are not what you want to see, especially in a small garden. Also they are best hidden away from direct summer sunlight as too much heat can kill beneficial worms, insects and bacteria.

The best solution for small gardens is to have two small size plastic compost bins. In the first bin put in your green waste; as you haven’t the mass of a large bin it’s very important that you make sure the green waste mix is varied and that moisture levels are just right. The ideal mix for a small bin are mixed layers of kitchen scraps, shredded paper, coffee grounds, grass clippings, cut up green garden pruning’s, and even human organic matter such as hair and urine (potty pee is fantastic in compost and around citrus trees).  Avoid bread, citrus, onions, meat, weeds and ‘number twos’. While all these products can be composted they can upset your bins fauna, attract vermin and possible introduce potentially poisonous diseases into your garden soil. For those who want to explore ways to compost animal poo there are well designed compost pits (advertised in specialist garden magazines) suitable for this purpose.

While not all organic materials are suitable for the small compost bin they don’t have to be chucked into the rubbish bin. In recent years most local authorities have provided a ‘green waste’ bin. This collected green waste is broken up and composted in huge scientifically controlled heaps which unlike home compost bins go to very high temperatures which kill all weed seeds and harmful bacteria. Some of these large heaps incorporate human waste (sourced from sewage plants) in the composting process. After processing, your council green waste is made into compost which is added to commercial potting mixes and other horticultural products. While we don’t get a direct financial return on the contents of this bin your community does. So when we quibble about what goes into our own garden compost systems we should make sure that kitchen waste such as citrus, egg shells, onions, pineapple tops and pumpkin seeds as well as garden weeds and twigs are not wasted by being thrown out in the rubbish bin, the correct place is the green waste bin.

Compost Made Easy
Many of us lead busy lives and we often have difficulty turning the compost heap. As regular churning is essential for a fine end result many gardeners have come up with cleaver ways to turn heaps without raising a sweat. The best way, especially for small compost heaps, is to add compost worms to the pile. Common garden worms are great recyclers but rarely venture into the warmer conditions of the compost heap. Compost worms (available from garden centres) are species which relish the warmer conditions inside the compost bin and will happily turn your green waste into humus. As they can’t live in the hottest phase of the composting process they have to have be able to escape to the earth when things get too hot. If the location of your heap avoids direct sun you will find that you can rely on your worms to do most of the turning and they will happily breed and multiply without becoming a pest.


Compost worms


The turning barrel compost bin is another easy method. Looking like an oversized tombola barrel, this bin is a large drum mounted onto a metal frame. The gardener simply adds green waste and a little water to the barrel. After closing the small entrance door, the barrel is turned by using a simple to use handle a couple of times a day. This system can produce compost in a couple of weeks in summer. Despite the expense of buying the compost barrel and frame, this method is ideal for people who want compost but don’t want to exert too much energy.

A far cheaper aid to turning conventional heaps is the compost screw. This tool is like an oversized corkscrew which you place in the middle of your compost heap. A slow turn of the handle gently incorporates the mix, bringing deeply buried green waste to the surface. Regular use of this screw-like-device along with added compost worms will reduce the need for turning your heap.

Despite the occasional setback, compost making is a fun way to recycle your green waste. Using the compost heap in tandem with your local council supplied green waste bin, can dramatically reduce your environmental footprint and will improve soil fertility in your garden.  Composting is not only a responsible thing to do it is also good exercise and mentally rewarding.


If you have a problem with your compost I suggest you read my post titled: Composting - when things go wrong http://reflectivegardener.blogspot.com.au/2012/08/composting-when-things-go-wrong.html


© Silas Clifford-Smith 2015

This post is an edited version of my 2009 article first published in Wellbeing magazine

Wednesday, 22 July 2015

Old views of the Royal Botanic Gardens, Melbourne

In 2011 I published some old images of the Botanic Gardens in Sydney. I began collecting horticultural themed postcards nearly twenty years ago after reading an English book titled Postcards from Kew. This well illustrated work highlighted a large collection of old postcards of the Royal Botanic Gardens in Kew, London. As a gardener I was intrigued by these images and went in search of Australian examples at markets and postcard fairs. Within a couple of years I had a collection of several hundred cards. While most of my collection is dominated by views of the Royal Botanic Gardens in Sydney I also have many images of other gardens around the world. Here are a few postcards depicting the Royal Botanic Gardens, Melbourne.


Garden near the Temple of the Winds
The Botanic Gardens in Melbourne was officially opened in 1846. One of the most popular parts of the 96 acre site is the view from the Temple of the Winds. This classically influenced structure was built in 1902 as a tribute to the former Victorian colonial governor Charles La Trobe who selected the site for the gardens.


Due to it's weedy nature pampas grass is one
plant you will not see in the garden today
Many general views of the gardens show large numbers of people enjoying the grounds. As one of the conditions of entry proscribed the consumption of alcohol or tobacco within the garden, this may explain its popularity with visitors, especially mothers and children.

Tree ferns and palms near the Director's house
Much of the lush tropical plantings in the gardens date from the time of William Guilfoyle who was Director of the Botanic Gardens from 1873-1909. The blue-toned image above shows some of the plantings near his residence in the grounds.

Artificially coloured postcard view of
the gardens near the Princes Bridge
Sucullents were a popular planting in the gardens during the 19th century but lost popularity in the early years of the 20th century when they became associated with the weedy spread of prickly pear in the country.

The Tea House
Old postcard views of the garden often highlight lost buildings and other garden structures. Above we see a view of the Tea House which was opened in 1900. Sadly, this building was destroyed by fire in 1970.


View of one of the  attractive glasshouses
Along with general views of the gardens the conservatories were also popular with visitors. Here we see one such greenhouse filled with a winter display of Bergonias and Cape Primroses.

I hope you enjoyed these images of this much-loved garden. Click on the following link to view images of the Royal Botanic Gardens, Sydney:
http://reflectivegardener.blogspot.com.au/2011/08/vintage-views-of-royal-botanic-gardens.html

Monday, 10 November 2014

Jacobean splendour

One of my favourite spring flowering bulbs is Sprekelia formosissima. This Mexican bulb of the Amaryllis family is best known as the Jacobean Lily, but is also called the Aztec Lily. Whatever name you choose, this plant looks best when planted as a group in a pot.

The Jacobean Lily in flower

The plants principal common name references the uncanny resemblance the blood red flowers have to the heraldic cross worn by the Spanish Catholic Order of St Jacob of Calatrava. This species has been in cultivation for a long time. It is listed growing (as Amaryllis formosissima) at the Botanic Gardens in Sydney in 1828.

The unassuming long-necked bulbs of Sprekelia formosissima

This bulb is easy to grow in warm temperate or sub tropical climes. The long-necked, drab looking, bulbs should be planted during winter, making sure that the necks stand proud of the potting mixture. Like ugly ducklings these hardy plants sprout attractive lily-like leaves in spring, soon followed by the flowering stem. While an easy plant to grow not all bulbs successfully bloom each year, so it is best to grow in groups. Of the three bulbs shown above only one had a flower. In Sydney these plants usually flower in early November.

Thursday, 9 October 2014

The floating garden

You don't need a large garden to make an impact. Here is the floating garden created by my dear brother, Jobo. An artist, and long time garden lover, he currently lives on an old narrow boat that tours the extensive English canal network. When I caught up with him recently his boat was moored in Little Venice in North London.

Jobo's floating garden

Jobo's upper deck is covered with a large array of plants and small statues.Selections include wall flowers, spurges, succulents, herbs and annuals. As river thefts are common there are no expensive pots, but that doesn't matter as the flowers are the stars of the show. When travelling Jobo often goes through canal tunnels, because of this no large plants are used.

The Katherine on the Grand Union Canal


Monday, 1 September 2014

Beautiful Weeds: Periwinkle

The first time I took any notice of this attractive plant was when I saw it growing in a Canberra garden where it was used as a ground cover beneath a deciduous tree in an island bed. This courtyard bed was surrounded by paving and the periwinkle was the only ground cover used there.  The plant was the lesser periwinkle - Vinca minor and it made an attractive low growing, yet dense, planting.


The distinctive windmill sail petals of the periwinkle

A year or two later I saw blue periwinkle - Vinca major, the larger ornamental species, growing in a large country garden. What appealed were the beautiful bluish single flowers along with the glossy dark green oval leaves. Now smitten by the plant I took a few rooted shoots home to my own garden and with a little care they soon thrived. That relocation was a bad mistake because within a couple of years the periwinkle soon spread throughout the shadier parts of my garden.  Instead of making a dense ground cover the plants habit was wiry and allowed other plants to grow through it. Soon realising that the plant was weedy I decided to rip the plant out of my garden. I now appreciate this beautiful plant in other peoples gardens rather than my own.


Periwinkle is often found growing 
in old cemeteries

The Vinca genus is a member of the Apocynaceae family, a poisonous tribe that includes the oleander and mandevilla.  The larger species is native to the Mediterranean area and prefers moist, shady sites.  Due to its popularity with home gardeners (sorry) the plant has become a garden escape in many areas.


Vinca major 'Variegata' 
growing among Asparagus

Vinca major flowers from late winter to spring. While most colours are bluish purple there is also a white cultivar. Another popular choice is the variegated form. The smaller sized species Vinca minor is native to south-west and central Europe and the Caucasus and grows in similar conditions to its larger cousin. The flowering period also lasts longer, from late winter to early summer. Roger Phillips and Martin Rix in their classic 1991 book Perennials (volume 1) list several cultivars: 'Albo-variegata' has white flowers and gold variegated leaves; 'Argenteo-variegata' has silver edged leaves; 'Atropurpurea' has deep-purplish-red flowers; and 'Flore Pleno' has double purplish-blue flowers, both with green leaves.

© Silas Clifford-Smith 2014

Tuesday, 26 August 2014

Yesterday's Gardens

I was saddened to hear of the recent death of publisher and historian Victor Crittenden OAM (1925-2014). While I can hardly claim Victor to be a close friend he was always friendly and willing to help historians and writers that shared his research interests. Below is my old review of his important work Yesterday's Gardens.


Yesterday's Gardens: a History and Bibliography of Australian Gardening Books 
By Victor Crittenden [2002]

This is a book for librarians and keen collectors of Australian garden books. The first edition was published a decade earlier, and it soon became an intellectual challenge among garden historians to find works not listed in the original edition.

Crittenden lists 208 books in this updated edition and chronological lists all garden related books published up to 1950. Notable publications listed include Thomas Shepherd's Lectures on Landscape Gardening in Australia (1836), E W Cole's (1880s) Coles's Penny Garden Guide, and the better known Yates Garden Guide which was first published in 1895.

The first garden publications date from the early 19th century and were often simple garden calendars published in Almanacs. According to Crittenden, the first locally produced garden publication was the New South Wales Pocket Almanac and Remembrancer for the year of our Lord and Savior 1806. By the second half of the 19th century more and more garden books were published and titles became less verbose. I especially love A E Coles's 1922 Half-hours in the Bush House, a title that may disappoint some non-gardeners.

While Yesterday's Gardens will appeal only to a small market, the author should be applauded for his research in producing this fascinating publication.

Yesterday's Gardens: a History and Bibliography of Australian Gardening Books 
By Victor Crittenden [2002]
Mulini Press, Canberra
276 pages, hardback, RRP A$50.00
ISBN 0949910-90-2

Post-script
Victor Crittenden's obituary was published in the July-September 2014 issue of Australian Garden History. 
Related Posts Plugin for WordPress, Blogger...